Showing posts with label fashion. Show all posts

Wednesday, December 10, 2008

I have a goal:

I need to make $100.00 in the next 24 hours. Everything in my shop is under $10.00 so I'm posting everywhere I can think of. I'm also open to suggestions!

Etsy
Buy Handmade
GirlisPoison


Have you ever had to come up with a certain amount of money in a hurry? What did you try?

Saturday, November 29, 2008

Blast To The Past!

You can relive the 80's with these shops even if you weren't there!

@ Etsy:

80sdiva offers free shipping on purchases $100.00 or more. Go 80sdiva!

80sLOVE has THE coolest necklaces all made with vintage charms.

80sRetroKid is the place to find the old toys you wish your mom hadn't thrown away.

CatseyeVintage features vintage gems from eras of the past including the 80's of course.

dirtybirdyvintage = vintage clothing, art and housewares

honeybeevintage has great pieces and manages not to fall into the ridiculously high priced vintage trap!

I love MaidenRaptureVintage's awsome photos...

Punkv0uge features a section for the guys.

Reruns has...well everything!

Don't have an Ety account? Sign up for free here!

Friday, November 28, 2008

Indie Designer Crush: Indiscretions


Indiscretions: Do you dare?
By Lux


I have known Mara, owner and designer of Indiscretions, for so long I couldn’t tell you how we began our online friendship. However, I’m no less glad that Mara is still around when so many other DIY designers that launched clothing labels around the same time have gone by the wayside. Indiscretions, and now Haute Indiscretion, continues to be a source of inspiration for me as a designer as well as for others in the DIY community.


This one is my favorite!


At first glance, many wannabe fashionistas probably would not know what to think of Mara’s funky and eclectic style. They may even shun it as being too “out there” or “off the wall” without seeing it’s true value. They might take her self-described, tongue-in-cheek approach to fashion as a sign that she is not a serious designer. Those who do would be dead wrong. There is a method to her madness, so to speak. Indiscretions as a clothing line is as unique as it is possible to get. Most of her pieces are OOAK (one of a kind) and as you can probably tell from the photos below you will not find clothes like this anywhere else. Even the fashion forward clotheshorses of Japan couldn’t dream up the garments that Mara does. It’s this kind of out of the box thinking that makes Mara such an inspiration in a sea of look alike t-shirt surgeons. She manages to keep a DIY aesthetic without doing what everyone else is doing. With an MA in Costume Studies/Decorative Arts from NYU as well as a BFA in Jewelry/Metalsmithing and Art History she definitely isn’t doing what everyone else is doing; she’s in a league all her own.


Mara’s studies at the Costume Institute at the Metropolitan Museum of Art have helped hone her skills in garment construction and pattern making, as any seamstress knows, this is not so simple a task. Her experience there also taught her a lot about textiles which, unfortunately too few indie designers know too little about. Her travels around the world have supplied her with ample inspiration as well as the rare materials she uses to bring her vision to life. As can be seen from her distinctive designs, Mara loves to experiment and does so frequently. A woman after my own heart! In addition to sewing and designing, she has also painted and even blown glass. This desire to work in different mediums adds another layer of interest to her designs. In addition to these other artistic pursuits and running her own business, Mara is a fixture in her local fashion and art scene. She has several fashion shows and collaborations with models and photographers under her belt.


Mara, who is based in New Mexico, is married and a proud parent of two. She has always had the aspiration to create an (in her own words) “unusual and unforgettable” clothing line. Not only has she succeeded but she continues to push the envelope and to challenge the rest of us to make our most out of the ordinary ideas a reality. Much like the heads of the major fashion design houses, she is so filled with creative energy that she would probably not be happy making the same garment over and over again. One day she may just have a team of worker bees to do that for her…


Inspiration located here:

Indiscretion (official site)

Mara's Blog

On LJ

My Space Page

Model Mayhem

More Photos

Tuesday, November 25, 2008

Tutorial: Off The Shoulder Crop Top (w/ sewing pattern)


80’s Off The Shoulder Crop Top

By Lux


Difficulty 2 out of 5


Materials:
Girl Is Poison Sewing Pattern: Piece 1 & Piece 2
1 yd stretch fabric (cotton knit works great)
Sewing machine or serger
Scissors
Pins
Thread

1) Wash and dry fabric to preshrink.


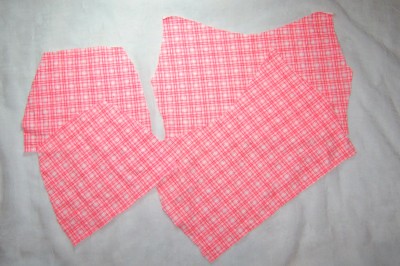
2) Print out the pattern pieces on standard size paper (8.5X11“). Cut them out along the bold black lines. Since these may not print exactly the same on all printers you may need to extend the lines to the very edges of the paper and then cut. Your pieces should end up looking like this: photo.


3) For S/M cut out your top pieces following the directions on the pattern and mark the symbols (stars, bolts, “flashes”). For M/L add 2” to each piece width wise. You should end up with 4 pieces: 2 sleeves, 1 back and 1 front. (photo)


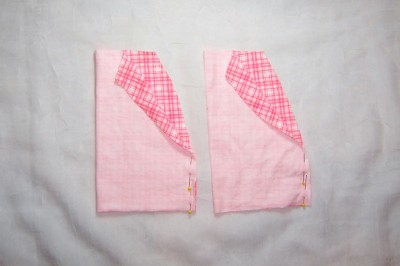
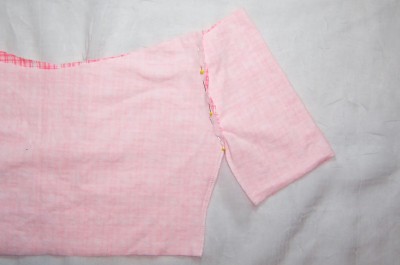
4) Take one sleeve and with the right side facing in match up the ends with the flash symbols and pin. Do the same to the other sleeve. (photo)


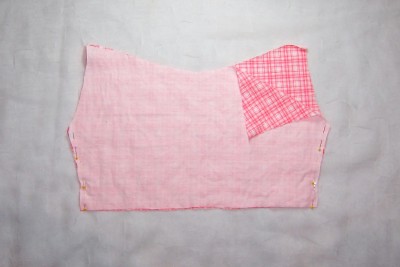
5) With right sides facing each other pin your front to your back matching the edges at the star symbols. (photo)


6) Sew the pieces where you have pinned them 5/8” from the edges. Sergers work great for stretchy fabrics, but if you don’t have one you can use a straight stitch. Just set it to a longer length and lower the tension a bit. Or if you prefer, you can use a zigzag stitch to prevent fraying depending on the type of fabric you are using. (photo)


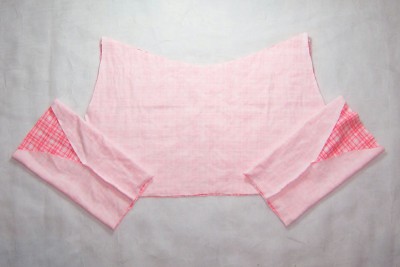
7) With right sides facing each other, pin your sleeves to your top matching the edges with the lightning bolts. Make sure your underarm seam matches up directly with your side seam. (photo)


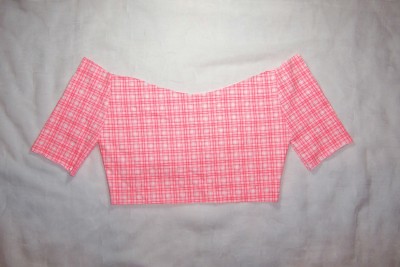
8) Sew the sleeves onto your top 5/8” from the edge. Turn your top right side out and it should look like this: photo.


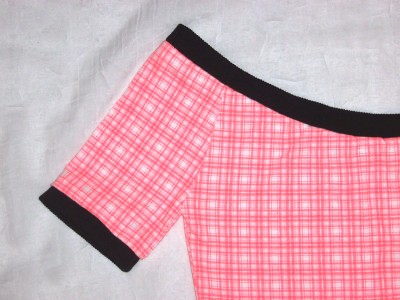
9) At this point you can finish the edges a couple of different ways. You can do a traditional hem by folding the edges over and straight stitching. You can serge the edges for a DIY look or leave them raw. OR you can band them like I did. (photo)


Adding Bands with Knit Fabric


I recommend banding. It makes the top look more polished and it’s super easy to do. To finish your edges by banding you will need to cut out long strips of the same type of fabric. You can use a contrasting color like I did, but make sure it is the same type of fabric or at least very similar.


First decide how wide you want the band, double that and add 1 ¼“. Next measure the edge you would like to band. You can do this by laying the top flat, measuring across doubling that measurement and subtracting 1“. Use these measurements to determine the size of the strips you will cut out. Do not add anything to the length for allowance, you want the band to be slightly smaller than the edge so it fits against you snugly. For example: my neckline measured 16” straight across and I wanted a 1” band so I cut out a piece measuring 3 ¼” by 37”.


Next, with right sides together, sew the two ends of the band together 5/8” from the edge. Turn it right side out, fold it in half lengthwise and iron it flat. Pin the band to your top matching the raw edges. Sew the band to your top. Since the band is slightly smaller you will have to stretch it a bit as you sew. Don’t stretch too much though or you’ll get an uneven look.


Repeat these steps for each edge and there you have it. Your 80’s off the shoulder top is done. Now you can break out your bicycle shorts and layer your top over a sports bra. Don’t forget the sweatband! :)


Tips:
~As with any pattern you may have to alter it to fit your body the way you like. One way to do this is by adding darts in certain places.
~You can also cut one or both of the pattern pieces smaller or bigger.
Variations:
~You can make a mini dress by lengthening the Front/Back piece by a few feet.
~Or make a long sleeved top by lengthening the Sleeve piece.
~You can add interest to your top by cutting the sleeves in different fabric.

Friday, November 21, 2008

Screen Printer of the Month: Brave Moonman


One Small Step for Brave Moonman, A Giant Leap for Style
By Lux


Self-proclaimed jack of all trades and master of none, Lindsey, is known for her fun and funky 80s inspired style. Items like mix tape pouches, floppy disk pins and calculator watches (!) share space in her Etsy shop along with the cool retro 80s style tees that first got my attention. Upon further inspection of her inventory I have decided that I want one of everything. And it appears that so do many others. Lindsey, who is based in Oakland, tends to have a lot of repeat buyers. It’s the same thing as trying to eat just one chip, you can’t have just one mix tape pouch. They come in so many cool color combos that it’s hard to choose a favorite. And who could pass up the chance to own a calculator watch? It’s a total conversation piece. You know that everyone is going to be asking you where you got it! With t-shirts and accessories inspired by the likes of Jem and the Holograms, nerd culture and even Lindsey’s own older brother; Brave Moonman is a total find for fans of 80s nostalgia. And it’s all operated by an artist who is barely old enough to remember the 80s!


With a degree in Apparel Design and Merchandising under her belt, Lindsey passed on getting a conventional job in the industry and started selling on Etsy in 2006 under the username lindseyporter. (She later opened an account under the name BraveMoonman.) Like many of her fellow “craft-trepreneurs” she resists the idea of a schedule and prefers to set her own hours. Also like so many of us, she was crafting practically out of the womb and couldn‘t imagine herself doing anything lame like working in a cubicle. When her signature Nintendo pouch became a popular item a friend suggested that she make cassette tape pouches and then those took off as well. The idea machine kept right on humming. Since then she has expanded her collection to include other items like her adorable mini 2X2 inch original paintings and my personal favorite: the black on gold tiger print t-shirt.


For now, Lindsey is taking her business one happy customer at a time. Despite her lack of “real” work experience, 100% of her buyers agree that her customer service is excellent. And it’s pretty obvious her product will keep people coming back for more. While she doesn’t know her ultimate direction, she is having fun and enjoying her craft and all the support she gets from fans of her work. The only thing that’s missing is your appreciation photo!


Get your dope Brave Moonman gear here.

Thursday, November 20, 2008

Tutorial: Friendship Bracelet


Basic Friendship Bracelet
By Lux

Difficulty: 1 out of 5

Materials:
Embroidery floss (in several colors or just a few or even just one, you choose)
Clipboard
Scissors
Your creative genius!

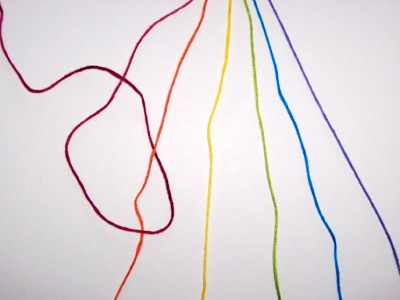
1) Measure out about 20 inches of embroidery floss and cut. This should give you plenty of “breathing room” in case you make a mistake and have to cut off and start over. Cut a few more 20 inch pieces. How many depends on how wide you want your bracelet. (I used 6 and ended up with a ¼ inch wide bracelet.) (photo)

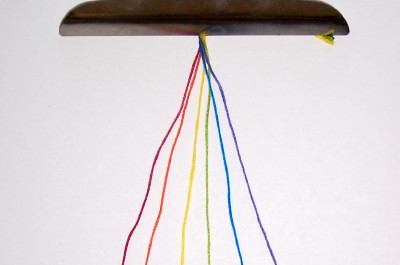
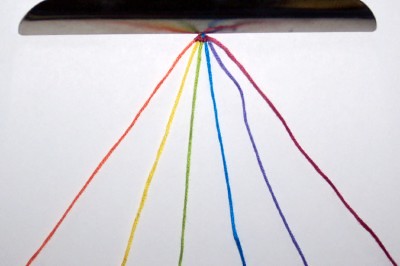
2) Tie your floss pieces in a knot about 3 inches from the end and clip the knot onto the clipboard. This will help stabilize your bracelet while you make it. (photo)

3) If you have more than one color, choose a color to make the first row. (I chose red.) If not, pick any piece to begin. This will be string #1. Wrap this string around the string next to it (string #2, orange in the picture) in a clockwise motion (photo) and pull through. (photo)

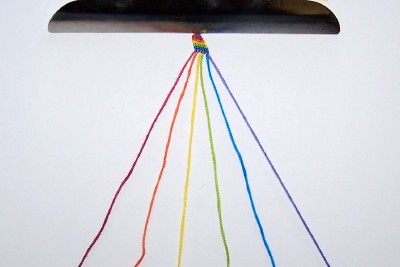
4) Wrap the next string in the row (string #3, yellow in the picture) in the same clockwise motion. Continue on down the row until you have wrapped string #6 (purple in the picture). (photo)

5) You have made your first row. Repeat the wrapping process with string #2 (orange in the picture), string #3 (yellow in the picture) and so on. (photo)

6) Continue on in the same pattern until your bracelet is as long as you need it. Tie off the end and cut leaving about 3 inches past the knot. This will give you plenty of slack to tie the bracelet onto your best bud.

Tips:
-The more strings you add the longer they have to be in order to ensure a long enough bracelet.
-Keep your knots tight, this will help make the texture nice and even.
-These bracelets tend to twist. You can flatten them out by using an iron on a medium heat setting.
-To keep the individual threads of the embroidery floss from separating you can wax them first using a recently lighted candle.

Variations:
Try for a friendship necklace or a belt if you have the patience!

Wednesday, November 19, 2008

It’s An Inner-city Thing

In the 90's Gwen Stefani dabbled in this style and put her own spin on it.


It’s An Inner-city Thing
By Lux

The 80’s were witness to a wide variety of types and styles of fashion. While not always explicable, it seems that clothing was experimented with more at that time that at any other time in history. Even today, true innovation is very rarely seen. Often designers, musicians, actors and others in the public eye look back to resuscitate some trend or another of the past and appear to be progressive. In fact, one can Google “80’s fashion” and countless pages of sites will come up. Browsing through some of them, one can see how elements of several of these styles have resurfaced many times since the 80’s. But there is one thing I have yet to see on any of these 80’s fashion sites. Site after site something is missing.

The 4 major types of mainstream fashion in the 80’s are usually represented: Hip Hop (ala Run DMC with oversize clothing, chunky gold chains and Adidas), 80’s Punk (torn clothing, spikes and studs, Mohawks and hair in every color), Glam/Hair Metal (BIG hair of course, inches of makeup, tight pants and lots of leather) and the oft ridiculed Preppy/Yuppie style (“young urban professionals“) which consisted of khaki pants or shorts paired with pastel shirts, sweaters tied around the shoulders, oversize blazers and a generally “clean cut” look. Then there are the various sub-genres within each of these groups as well as the rare, but occasional, cross influences. However, like I said, something is missing. Where are the Cholas?

I grew up in a lot of places but mostly in San Jose, California, in the poorest areas, dare I say the “ghettoes” of SJ. In the 80’s gangs were a huge problem. There were (still are as I hear it) two major warring gangs: the Crips and the Bloods. Within each there were various crews of course. But strangely enough, members on both sides of the feud, no matter what the crew, shared the same style. No matter what side you claimed the clothing was practically the same. It was so similar that it was almost like a uniform. Guys and girls both wore basically the same articles. A typical outfit consisted of a pair of Dickies or Ben Davis pants (cuffed and creased), a white ribbed “wife beater” tank top (sometimes air brushed with the particular person’s nickname) or plain white T-shirt, a flannel also called a Pendleton (red or blue depending on what your affiliation) and the signature Cholo hairstyle. Hair was a big deal. It was common for one to spend a significant amount of time on one’s hair. The look could not be completed without the proper hairstyle. Cholas and Cholos both had hair reminiscent of the 50’s which is, in fact, what they were trying to emulate if not in dress then in spirit. (The very first Cholos were the children of Latin American immigrants in the 50‘s. But back then they wore “Zoot Suits” which were basically cheap, slightly exaggerated versions of the pinstripe suits white American gangsters wore.) For girls the hair had to be teased and sprayed into a tall bouffant (think Elvira), for guys it was generally feathered back, moussed and often protected by a hair net. Adornments on the girls were kept to a minimum, the makeup however tended to be heavy on the eyes and the questionable lip liner sans lipstick trend seems to have began during this time. The guys had their own set of adornments as well in the form of tattoos. The Virgin Mary, gang affiliations, family surnames in Old English text and faces of loved ones who had passed away were popular. Some Cholos would sport prison tattoos as status symbols showing them to be “real” gang bangers who had served time. And the “rag” that those who had been jumped (physically beaten by several members of a crew) into a gang wore must not be forgotten. It was a paisley bandana in either red or blue. One did well not to get caught alone wearing the wrong color in the wrong neighborhood.

As I was growing up I was surrounded by people who dressed this way. This was what I knew. I was surprised to find when researching 80’s fashion online that this style was so under-represented. The crazy get-ups of Cyndi Lauper and David Lee Roth were what people on TV wore. No one I knew dressed that way, they’d probably get beat down if they did. The 80’s for me were: guys restoring vintage low riders in their garages, Motown oldies from the 50’s and 60’s playing from people’s tape decks and Cholos and Cholas cruising up and down the boulevard. Much like the other 80’s styles I’ve mentioned, this wasn’t just about what you wore; it was a way of life.